Japan Police Bear Drill: Amazing Rescue Video
Face-to-Face with a Grizzly Threat: Nikko's Wild Bear Drill!
 Did you know that Tochigi Prefecture has already seen THREE bear attacks this year? That's why Nikko's police and hunters aren't taking any chances. They recently staged an intense, adrenaline-fueled simulation to prepare for the real thing – a face-off with a rogue bear. Want to know what happened? Read on!
 A Furry Fury: The Simulated Attack
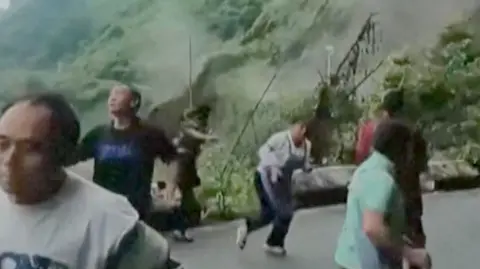
 Imagine this: The crisp mountain air hangs heavy with anticipation. Suddenly, a hulking figure bursts from the woods—a man in a realistic bear suit, charging forward with surprising speed! This wasn't just any drill; it was a full-blown simulation of a bear attack in the beautiful, yet potentially dangerous, Nikko region of Tochigi Prefecture.
 The crackle of exploding firecrackers filled the air, a jarring counterpoint to the growling "bear." This dramatic scene showcased the effectiveness of using pyrotechnics to deter aggressive animals. The drill wasn't just about scaring off the bear; it was about safety.
 Beyond the Blast: Approaching a Tranquilized Threat
 But the action didn't stop there. The simulation also highlighted the crucial post-incident procedures. The "bear," now "tranquilized" (or perhaps just tired from its sprint), lay inert. The exercise meticulously demonstrated the safest methods for approaching a sedated bear, emphasizing the delicate balance between necessary intervention and potential risk.
 A Crucial Lesson for Nikko's Residents
 This comprehensive bear safety drill wasn't just about showmanship; it was a vital training exercise. With bear encounters on the rise in Tochigi Prefecture, understanding the best response strategies is crucial for both residents and visitors alike. This is your chance to learn how to protect yourself in a real-life encounter. So what are the key takeaways from this intense training session? Stay tuned for part two to discover the vital lessons learned and how *you* can stay safe in bear country!


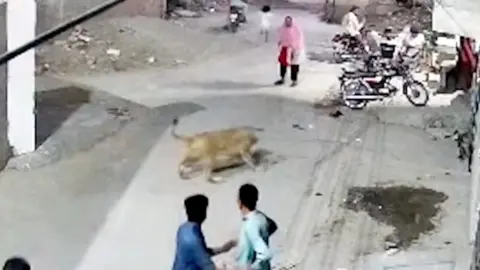


Image 1
Image 2
Image 3
Image 4
Image 5
Image 6
Image 7
Image 8
Image 9
Image 10
Image 11
Image 12
Image 13
Image 14
Image 15
Image 16
Image 17
Image 18
Image 19
Image 20
Image 21


Comments
Post a Comment